Showing posts with label Tips tools and techniques. Show all posts

Thursday, 10 November 2011

Feather Fans!

I've really enjoyed quilting my bought in quilt tops, it's given me the opportunity to experiment on a variety of styles and designs of quilts but also the quality of the piecing has thrown up lots of shall I say 'educational opportunities'.....I've needed to work my way around a few problems and find out how to enhance the piecers work to the best of my abilities.

Before quilting

I have to say that this top didn't really have any issues.....I did re-arrange the borders a little but that's all....I used this top as one of my 'what if' quilts, 'What if I try this and what if I try that'.
I tried a few new to me techniques including Ronda Beyers "S" shaped rulers .....only I would choose to use the largest of her rulers for my first try, those things are huge and a little difficult to manage....imagine it, ruler in one had, longarm in the other?

This is all freemotion, handguided and ruler work!


Everyone knows I'm a 'fan of feathers'....so this is 'Feathered Fans'.

It finished at 88"x66", I used white Glide thread on top, Bottomline in the bobbin, Super Poly batting/wadding gave lots of definition. When I spied it I just couldn't resist this fabric for the backing....it's Rosalee from Ikea, the colours were perfect for this top!


I've noticed a few new followers are stopping by, I'd like to say welcome to you all!


Greenfairy Giveaway

The Greenfairy  at http://greenfairyquilts.blogspot.com/  is having an awesome giveaway....well, Clint is really busy while Judy is away learning lots of new quilty stuff....why don't you pop on over to 'The Green Fairy' and take part in the fun...you never know you may be a winner??

Tuesday, 6 September 2011

Best to be on the safe side.....

What do they put in those colour catchers??? Synthrapol???


The colours of this batik wide back are perfect for this pieced top....I washed it when I bought it last year but thought I had better wash it again...threw in a colour catcher, washed it again and again and again...The first time was probably without a colour catcher, the next three times with a colour catchers....Then once with a piece of cotton muslin that came out tinged with turquoise and once with a colour catcher and cotton muslin, the muslin came out white this time but still lots of colour on the catcher.....well, proves that the catchers work. I think this backing has been washed six times in all...there's a lot of white in my top....wonder if I should wash it again????

I think enough is enough???

Tuesday, 23 August 2011

It always amazes me!

Take a look at this simple jelly roll quilt top....forgot to get a photo of the whole top before I started, sorry...but it's simple right, nothing fancy! Basically it's a colour graded quilt working with the colours from the jelly roll.


I had some glazed cotton that matched so well that I just had to use it for the backing and binding....I bound the quilt while still on the frame....even that little end bit, it can be done on the frame even though it's a bit tricky.....you have to be very careful of your fingures and take just one stitch at a time...mind you wouldn't want to do this on a show quilt....


But what really amazes me is the difference a bit of quilting can make.....


That's an all over 'freemotion jelly feather fill'....

Just goes to show....it's the quilting that makes the quilt!


Sunday, 3 April 2011

Titanium!

Titanium...nothing new, it's been around since the 1790's when it was first discovered in Cornwall, England of all places, most probably in the tin mines there! 
It's found in all living things but principally rocks, water bodies and soils.....titanium can be alloyed with iron, aluminium and other metals to produce strong lightweight alloys for aerospace, the motor industry, orthopedic implants, dental instruments....the list is endless!
The two most useful properties of the metal are corrosion resistance and the highest strength-to-weight ratio of any metal.......

Why am I interested in titanium????

Well, I wasn't!
I found a supplier in the UK for longarm needles...just like the ones I always use.....that's what I thought....until they arrived......then I realised that these were not my usual needles but titanium coated needles.......after a discussion on one of the forums I frequent I realised that lots of people were very happy with titanium needles....they keep their sharpness longer, they are stronger, so don't break as often.... so that makes them cheaper right?

Sounds great doesn't it....until you break one!

This is the first and last titanium needle I will ever use.....That was friday evening 1st April....some April fools day huh!


Can you see it.....look in close....that needle snapped on the intersection of a quilt block....this is a beautifully pieced quilt...it's not an exceptionally thick corner but maybe 6 thicknesses of fabric....that needle was jammed in there and not going to budge.....it blew the fuse on my machine, it blew two fuses......which probably saved anymore damage as it took a while to really realise what had happened!

I eventually realised that I had to do major surgery on my longarm and remove the hook/bobbin assembly.....I was supported through this by some wonderful assistants on the APQS forum...lol.....


I couldn't remove that needle, my DH couldn't remove the needle, I tried again but had to admit defeat and ask my DS who put the hook in a vice and with one sharp tap released the needle!
Did you ever wonder what your hook/bobbin assembly looks like totally dismantled.....


Now, all joking aside....the hook/bobbin assembly is now put back together and in my machine.....I had to re-time my longarm!!!!
I can't test it out just yet as my good friend Linzi has posted me some new fuses which I expect to arrive tomorow. 
Although everything looks and feels OK, I do not anticipate that the following days will go smoothly......I do expect problems and will be ordering a new hook/bobbin assembly which will probably take a week or so to arrive!  

If you are thinking about the merits of using titanium needles, think very carefully....a pack of ordianary needles is quite cheap...a new hook/bobbin assembly is not so cheap!

So why did I bother going through this proceedure...when I intend to buy a new hook/bobbin assembly????

Well, there is an up side to this.....I learned sew much about my machine this weekend....I am now not quite so anxious about having to do service on her...we have become better acquainted with each other.....that can only be a good thing!

My longarm is very precious to me!


Wednesday, 9 March 2011

When you need some elbow room!

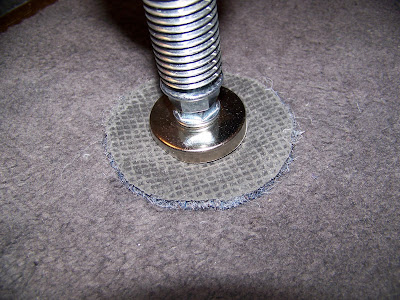
When I bought my longarm...I was conscious of the fact that the floor in my studio had bouncy well sprung floorboards. So to stop my machine and frame from moving around I cut four of these disks from an off cut of my heavy duty kitchen carpet and installed one upside down (carpet to carpet) under each leg.....


They worked really well, my frame didn't move and there was no vibration at all!


But I did have a problem....when working from the back of the machine as I do occasionally when using a pantograph, I kept banging my elbows on the wall behind, this meant that I couldn't get smooth enough curves  (I'm very picky)....I just needed another six inches of space but those carpet disks kept my frame so stable that there was no way I could move it....it weighs a ton!

One solution would have been to install castors designed specially for my frame....but they cost £££'s!


I found another solution that cost me just £2.00 for a pack of four....


I installed one of these sliders under each leg with the plastic side down on the carpet and the foam upwards and now I can slide that very heavy frame in and out bit by bit when I need too to give me those extra six inches that I need to smooth out those curves!!!!!

"Voila"!


Sunday, 6 February 2011

Fieron's First Quilt!

I am so proud of my Grandaughter Fieron for her perseverance with this quilt.....she is eight years old and although I did help and encourage when needed, I am sure Fieron has done 75% of this quilt herself....

All the nine patch blocks finished hooray....


Here she is piecing the blocks together as seen in a previous post.....


Fieron was so pleased with our choice of backing fabric.....snow leopard fleece/fur.....she stroked it for the rest of the afternoon....


We decided on the RnS swirls boards so that Fieron could quilt it herself from the back of the machine...then we had a bit of a set back when I realised that I had the wrong bracket for my new and updated 'Bliss' carriage......so, we had to come to a compromise as we needed this quilt quilted NOW.....I have to say that Ron from RnS sent me a new bracket (from a Lenni) that will fit on my Bliss carriage...'Thank you so much Ron'!

We had to use the upfront system on my Quiltazoid, the RnS boards can be used on it but we could use only one board...... that meant moving the system four times across the quilt on each advance.....a bit tricky but WE managed it......
I moved the system, rolled on the quilt and 'Fieron Quilted it'!

Here she is standing on a chair.....Look at the concentration........
 

I decided at the last minute to use a layer of Pellon Legacy 80/20 batting...it's a very thin batting...we used Black metro thread, it doesn't show up on the fleece but you can see the texture, the quilt finished at 60" x 84".

Here it is all finished.....


This swirls board design is so useful...I've seen it on a variety of different pieced quilts and it always looks wonderful...it's very versatile and will be useful on customer quilts.....


Fieron loves that her name is quilted into the quilt....


Fieron's quilt in it's new home!


Thursday, 27 January 2011

Life of an Ebay Quilt Top ... Part 2....

Well, just made it for January, this is my first finished quilt for 2011 ... as some of you know this is an ebay quilt top.....Part One can be found here


I filled the outside borders with freehand echoed feathers on a curved stem....not too obvious on the patterned fabric but I was please with the way they looked from the back of the quilt on the cream fabric.

On the inside border I went all out with hatching using a template board on my Quiltazoid another first....it was a long way around that border but I was amazed at how it turned out and how my hatching matched up at the join point.....


As I worked my way around the nine patch blocks I stabilised the quilt all the way to the bottom. In the nine patches I did continuous curve using my Fine Line Rulers from Carol Olson at Accents in Design, these rulers have finger grips to hold onto so are very secure for using around your hopping foot, I finished off those coloured blocks with a stylised swirl as I went.


Once everything was stabilised I came back to the top and quilted the plain blocks, again I used my Quiltazoid but this time with the feathered wreath template, this was the first time for this template too.... a bit tricky at first using the segments but once I ignored the instructions and just followed my instincts it was fine!  Freehand echoes, pebbles and tendrils.


This quilt finished at 82" x 90", I used Quilters Dream mid loft Poly and Metro thread in cream top and bottom.

Bearing in mind that this was a cheap and grubby quilt top....I think the terms Silk Purse and Sow's Ear come to mind....

"What do yo think"?